
You've probably heard that fermented foods are good for your gut — but you might not realize just how transformative they can be. From the tangy crunch of homemade sauerkraut to the fizzy probiotic punch of kombucha, fermented foods have been a cornerstone of traditional diets for thousands of years. Modern science is finally catching up, confirming what cultures worldwide have known all along: fermentation doesn't just preserve food — it supercharges it with beneficial bacteria, enzymes, and bioactive compounds that your gut microbiome craves.
The best part? You don't need fancy equipment or culinary training to start fermenting at home. With a jar, some salt, fresh vegetables, and a little patience, you can create probiotic-rich foods that rival anything on store shelves — for a fraction of the cost.
If you're new to gut health, start with our complete guide to gut health for a broader foundation. You may also want to explore how probiotics compare to fermented foods, learn about prebiotic foods that feed your gut bacteria, or discover how fermented foods can support your immune system.
What Do You Need to Know Before Starting to Ferment Foods at Home?
Home fermentation is a simple, safe, and affordable way to create probiotic-rich foods using basic kitchen ingredients. The process relies on lacto-fermentation, where naturally occurring Lactobacillus bacteria convert sugars into lactic acid, preserving the food and creating a thriving ecosystem of beneficial microbes. Most vegetable ferments require only salt, water, fresh produce, and a clean jar.
What Is Lacto-Fermentation and Why Does It Matter for Gut Health?
Lacto-fermentation is the most common and beginner-friendly form of food fermentation. When you submerge vegetables in a salt brine, you create an anaerobic (oxygen-free) environment where Lactobacillus and other lactic acid bacteria (LAB) flourish. These bacteria metabolize sugars in the vegetables, producing lactic acid that lowers the pH and naturally preserves the food. This process also generates short-chain fatty acids (SCFAs), B vitamins, vitamin K2, and enzymes that enhance nutrient bioavailability.
Research from Stanford Medicine confirms that fermented food consumption increases gut microbiome diversity and reduces markers of systemic inflammation — two key factors for overall digestive and immune health.

What Equipment Do You Need?
You don't need much to get started:
| Item | Purpose | Essential? | Approx. Cost |
|---|---|---|---|
| Wide-mouth mason jars (quart) | Fermentation vessel | Yes | $8–$15 for 4 |
| Glass fermentation weights | Keep veggies submerged | Highly recommended | $10–$15 |
| Airlock lids (optional) | Allow CO2 release | Optional but helpful | $12–$20 for 4 |
| Non-iodized salt | Creates brine | Yes | $5–$10 |
| Digital kitchen scale | Accurate salt measurement | Highly recommended | $10–$15 |
What Salt Ratio Should You Use?
Salt concentration is the single most important variable in successful fermentation:
| Vegetable Type | Salt % | Examples |
|---|---|---|
| Hard/low-water vegetables | 2% | Carrots, beets, broccoli, cauliflower |
| Shredded cabbage (sauerkraut) | 2%-2.5% | Green cabbage, red cabbage |
| Soft/high-water vegetables | 3%-4% | Cucumbers, squash, peppers |
| Whole fruit/olive ferments | 5%-10% | Olives, umeboshi plums |
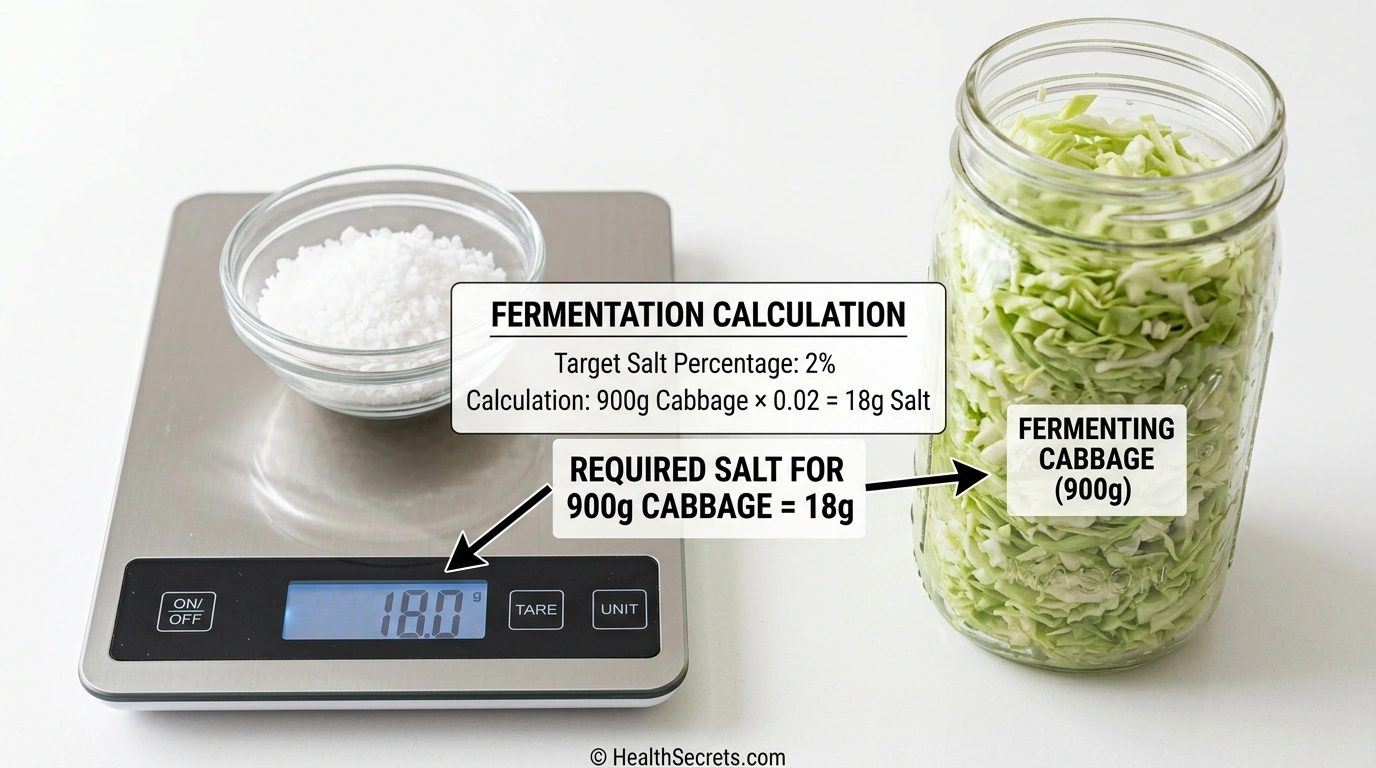
| To calculate: weigh your vegetables plus water in grams, multiply by your target percentage (e.g., 0.025 for 2.5%), and add that weight in salt. |
How Do You Prepare Your Fermentation Workspace and Ingredients?
A clean workspace and quality ingredients are the foundation of every successful ferment. Start by washing all jars, weights, and utensils with hot soapy water — sterilization is unnecessary and can actually inhibit the beneficial bacteria you want to cultivate. Choose fresh, organic vegetables when possible, as pesticide residues can slow fermentation.
Choose non-iodized salt — iodine inhibits bacterial growth. Sea salt, kosher salt, or Himalayan pink salt all work well. Avoid table salt with anti-caking agents. Use filtered or dechlorinated water for brines, as chlorine can kill beneficial bacteria.
Set up your fermentation area in a spot with consistent room temperature (65°F–75°F / 18°C–24°C), away from direct sunlight. Warmer temperatures speed fermentation but may produce more intense flavors. Cooler temperatures slow the process and yield milder, crunchier results.

How Do You Make Basic Sauerkraut at Home?
Sauerkraut is the perfect beginner ferment — it requires only two ingredients (cabbage and salt) and produces a probiotic-rich food packed with Lactobacillus plantarum, vitamin C, and digestive enzymes. Homemade sauerkraut contains far more live cultures than most store-bought versions, which are often pasteurized.
Ingredients:
- 1 medium head green cabbage (about 2 lbs / 900g)
- 1 tablespoon (18g) non-iodized salt (approximately 2% of cabbage weight)
Instructions:
- Remove outer leaves and core the cabbage. Slice into thin shreds.
- Place shredded cabbage in a large bowl and sprinkle salt evenly over it.
- Massage and squeeze the cabbage firmly for 5–10 minutes until it releases enough liquid to create its own brine.
- Pack tightly into a clean wide-mouth quart jar, pressing down to submerge cabbage below the brine.
- Place a fermentation weight on top to keep cabbage submerged. Cover with an airlock lid or a loose-fitting lid.
- Ferment at room temperature (65°F–75°F) for 3–10 days. Taste daily starting at day 3.
- Once it reaches your desired tanginess, seal tightly and refrigerate. It will keep for months.
For more on the specific health benefits of this classic ferment, see our guide to sauerkraut benefits.

How Do You Make Simple Kimchi at Home?
Kimchi is Korea's iconic fermented condiment, and making it at home lets you control the spice level and ingredients. The combination of napa cabbage, chili flakes, garlic, and ginger creates a complex, spicy, umami-rich probiotic food with unique Lactobacillus strains not found in sauerkraut.
Ingredients:
- 1 medium napa cabbage (about 2 lbs / 900g)
- 2 tablespoons non-iodized salt
- 3 tablespoons Korean chili flakes (gochugaru)
- 4 cloves garlic, minced
- 1 tablespoon fresh ginger, grated
- 2 green onions, chopped
- 1 tablespoon fish sauce (optional — omit for vegan)
- 1 teaspoon sugar (feeds initial fermentation)
Instructions:
- Chop cabbage into 2-inch pieces. Toss with salt in a large bowl and let rest 1–2 hours until wilted.
- Rinse cabbage briefly and squeeze out excess water.
- Mix chili flakes, garlic, ginger, green onions, fish sauce, and sugar into a paste.
- Massage the paste into the cabbage until evenly coated.
- Pack tightly into a clean jar, pressing down to eliminate air pockets.
- Ferment at room temperature for 1–5 days, burping the jar daily to release gas.
- Taste daily — refrigerate when it reaches your preferred level of tang and fizz.
Discover the full nutritional profile and research behind kimchi in our kimchi benefits guide.

How Do You Make Lacto-Fermented Pickles?
Lacto-fermented pickles are entirely different from the vinegar-brined pickles you find on most grocery shelves. True fermented pickles develop their sour flavor from lactic acid bacteria — not added vinegar — and they're alive with gut-friendly probiotics. The key is using a pour-over brine method rather than the dry-salt method used for sauerkraut.
Ingredients:
- 1–2 lbs small pickling cucumbers (or regular cucumbers sliced into spears)
- 3 cups filtered water
- 1.5 tablespoons non-iodized salt (approximately 3% brine)
- 2–3 cloves garlic, peeled and smashed
- 1 sprig fresh dill (or 1 teaspoon dill seed)
- Optional: black peppercorns, mustard seeds, bay leaf, red pepper flakes
Instructions:
- Dissolve salt in water to create the brine. Stir until fully dissolved.
- Pack cucumbers vertically into a clean quart jar. Add garlic, dill, and spices.
- Pour brine over cucumbers until fully submerged. Leave 1 inch of headspace.
- Place a fermentation weight on top. Cover with airlock lid or loose lid.
- Ferment at room temperature for 3–7 days. Bubbling indicates active fermentation.
- Taste at day 3 — they should be sour and crunchy with no vinegar taste. Refrigerate when done.
Add a grape leaf or oak leaf to your jar — the tannins help keep pickles crispy.

How Do You Make Water Kefir at Home?
Water kefir is a refreshing, dairy-free fermented beverage made with water kefir grains — translucent, gel-like cultures of bacteria and yeast (not actual grains). It produces a lightly fizzy, mildly sweet probiotic drink that's excellent for people who can't tolerate dairy-based kefir. For more on the benefits of traditional kefir, see our kefir benefits guide.
Ingredients:
- 3–4 tablespoons water kefir grains
- 1/4 cup organic cane sugar
- 4 cups filtered, dechlorinated water
- Optional for second fermentation: fruit juice, lemon, ginger
Instructions:
- Dissolve sugar in warm water. Let cool to room temperature.
- Add water kefir grains to the sugar water in a quart jar.
- Cover with a cloth or coffee filter secured with a rubber band — kefir grains need airflow.
- Ferment at room temperature for 24–48 hours. The liquid should taste slightly tangy, mildly sweet, and lightly fizzy.
- Strain out the kefir grains (save them for the next batch). Pour the liquid into a bottle.
- Optional second fermentation: add a splash of fruit juice, seal the bottle, and let sit 12–24 hours for more fizz.
- Refrigerate and enjoy.
How Do You Brew Kombucha at Home?
Kombucha is a fermented tea beverage made with a SCOBY (symbiotic culture of bacteria and yeast). It undergoes two fermentation stages: the first develops the tangy base, and the second adds carbonation and flavor. Kombucha contains acetic acid, B vitamins, and a diverse array of probiotic strains. Learn more in our kombucha benefits guide.
Ingredients:
- 1 SCOBY with 1/2 cup starter liquid (from a previous batch or store-bought raw kombucha)
- 4 bags black or green tea (or 1 tablespoon loose leaf)
- 1/2 cup organic cane sugar
- 4 cups filtered water
Instructions:
- Brew tea with boiling water and sugar. Stir until sugar dissolves. Let cool to room temperature — heat kills the SCOBY.
- Pour cooled tea into a wide-mouth glass jar. Add the SCOBY and starter liquid.
- Cover with a cloth or coffee filter secured with a rubber band. Never seal airtight during first fermentation.
- Ferment in a warm, dark spot for 7–14 days. Taste at day 7 — it should be tangy with slight sweetness.
- Remove the SCOBY and reserve 1/2 cup liquid for your next batch.
- For second fermentation: pour kombucha into swing-top bottles, add fruit, juice, or ginger, seal, and let sit 2–4 days for carbonation.
- Refrigerate and open carefully — homemade kombucha can be very fizzy.

What Are the Most Common Fermentation Mistakes to Avoid?
Even experienced fermenters make mistakes, but most fermentation failures come from a handful of easily avoidable errors. Understanding these common pitfalls will save you time, ingredients, and frustration while ensuring consistently successful ferments.
- Mistake 1: Using iodized table salt. Iodine inhibits the beneficial bacteria needed for fermentation. Always use non-iodized sea salt, kosher salt, or Himalayan salt.
- Mistake 2: Not keeping vegetables submerged. Any vegetable exposed to air above the brine can develop mold. Use fermentation weights and check daily.
- Mistake 3: Using chlorinated water. Chlorine kills bacteria — including the good ones. Use filtered water or let tap water sit uncovered for 24 hours to allow chlorine to dissipate.
- Mistake 4: Fermenting in too-warm temperatures. Temperatures above 80°F (27°C) can produce overly sour, mushy ferments and encourage unwanted bacteria. Stick to 65°F–75°F.
- Mistake 5: Confusing kahm yeast with mold. Kahm yeast appears as a white, flat, wrinkly film on the surface. It's harmless — just skim it off. True mold is fuzzy, raised, and often colored (green, black, pink). If you see fuzzy mold, discard the entire batch.
- Mistake 6: Starting with too much too fast. If you're new to fermented foods, begin with 1–2 tablespoons daily and gradually increase. Introducing large amounts suddenly can cause bloating, gas, and die-off reactions as your microbiome adjusts.

Is Fermenting Foods at Home Safe? When Should You Discard a Ferment?
Home fermentation has an excellent safety record when basic guidelines are followed. The acidic environment created by lactic acid bacteria (pH below 4.6) effectively prevents the growth of pathogenic organisms like Clostridium botulinum, E. coli, and Salmonella. In fact, properly fermented vegetables are safer than raw vegetables in many respects.
When to discard a ferment:
- Fuzzy, raised mold in any color (green, black, pink, orange) — not to be confused with harmless white kahm yeast
- Foul, putrid smell (healthy ferments smell sour and tangy, not rotten)
- Slimy, extremely soft texture throughout (some softening is normal)
- Any sign of pink or orange discoloration in the brine
Who should exercise caution:
- People with histamine intolerance — fermented foods are naturally high in histamine and may trigger headaches, flushing, digestive distress, or hives
- Those with compromised immune systems — consult a healthcare provider before consuming live-culture foods
- People taking MAO inhibitors — tyramine in fermented foods can interact with these medications
- Those with SIBO (small intestinal bacterial overgrowth) — introducing additional bacteria may worsen symptoms temporarily; work with a practitioner
For more on how fermented foods interact with specific digestive conditions, see our guide on fermented foods and IBS.
Action Plan
What Should You Do First to Start Fermenting Foods for Better Gut Health?
Follow the sequence below, work through each phase in order, and use the checklist as your practical implementation guide.
Begin with a single, simple ferment like sauerkraut to build confidence, then gradually expand your repertoire and daily intake over 4–6 weeks. This phased approach lets your gut microbiome adapt while you develop your fermentation skills.
Week 1–2: Your First Ferment
- Gather basic supplies: wide-mouth quart jars, non-iodized salt, fermentation weights
- Make your first batch of sauerkraut (Step 2)
- Start eating 1–2 tablespoons of fermented food daily
- Keep a simple log of how your digestion responds
Week 3–4: Expand Your Repertoire
- Try a second ferment: kimchi or lacto-fermented pickles
- Increase daily intake to 2–4 tablespoons per meal
- Explore prebiotic foods to feed the beneficial bacteria you're introducing
- Order water kefir grains or a kombucha SCOBY for beverages
Week 5–6: Build Your Routine
- Begin a water kefir or kombucha batch
- Aim for 2–3 different fermented foods daily
- Experiment with flavor combinations and seasonal vegetables
- Consider a comprehensive gut health protocol for deeper support


